Modifications We've Made
Every RVer has different needs and desires, and certainly different ideas as to what constitutes the most livable RV for their particular tastes. No RV is perfect, and none are defect free—but the freedom to go where you want, at the time you desire, and to always be "at home" when the rig is parked is a powerful influence on lots of folks who desire to see this wonderful country of ours—the United States.
Every motorhome has different pros and cons for every individual. There is no motorhome made that satisfies the desires of everyone. Everyone wants to make tweaks and changes to their home on wheels —to make their space more comfortable, more convenient, seemingly more spacious, and especially to make living in their motorhome more convenient.
Linda and Mike were no exception after we took delivery of our new motorhome. Almost immediately, certain realizations were made that things could be different, needed to be changed, or were an irritant.
With Linda being a space oriented person (and having a real knack for packing lots of stuff in a small space, but being anti-clutter at the same time), and Mike enjoying both electrical tasks and having a penchant for woodworking, it was a foregone conclusion that their new motorhome would undergo more than one modification.
Both being observant folks (and without guilt in "borrowing" a good idea seen on another RV during their travels), Mike and Linda have made several modifications to their 2006 Suncruiser 33V motorhome. As we use our rig more and more, we continually find areas that need tweaking—some ideas being easy to implement, and others still on the back burner, due to their complexity or difficulty in bringing them to fruition.
All of the tweaks (mostly additions, but a few deletions here and there) have resulted in a more livable space that we call "home" when we are on the road away from our firmly rooted stick house in northern California. It seems that every time we are on the road, one or the other of us (and sometimes both of us) find an area that can be "improved."
Even though we have been quite pleased with our motorhome, we are still making tweaks and changes after almost four years.
The tweaks, changes, and additions that we have made are grouped into four main categories:
- Electrical Modifications
- Electronic Modifications
- Space Modifications
- Convenience/Esthetics Modifications
- Utility Modifications
This section attempts to show you, in words and pictures, most of the "changes" that we have made to our motorhome since we first "moved in" in January of 2006—with the motorhome fresh from Winnebago Industries in Forest City, Iowa.
We hope that some of the things we have done to our coach might give you a new idea or, better yet, trigger an idea of your own that specifically fits you, your living style, and your motorhome.
Electrical Modifications
For some reason unknown, Mike enjoys working with electrical circuits. Therefore, it was fun (most of the time), rather than a chore, to make changes to our motorhome's electrical circuits. Some 110-volt duplex receptacles were moved and some were added where we felt the need. Of course, the most difficult part of the changes was finding out what wire went where or was fed from where.
Extra Kitchen Outlet.
The first order of business was the addition of a second 110-volt duplex receptacle above the kitchen sink. There was already one receptacle next to the florescent light over the sink (perfect for the coffee pot), but a second receptacle on the other side of the sink light (on the underside of the overhead cabinet) would be an ideal spot to plug in the toaster.
We were fortunate to find an RV supply store in Yuma that had the regular RV-style outlets in stock and the right color at a very reasonable price, so of course we bought three of them.
Installation of the second receptacle was quite easy, since the cabinet had a false bottom, and the electrical wires were easy to access, add a J-box, and run new wire to the location of the new receptacle.
Extra "Vanity" Outlet.
We knew, even before we bought our new motorhome, that the vanity area in the bedroom was the perfect place for a dedicated computer work space. However, we knew that only one duplex receptacle wasn't going to be enough.
Adding a second receptacle below the table top proved to be quite easy, since temporarily removing both large file drawers gave us plenty of side access to the receptacle above the vanity top. Running a cable from the upper outlet to the new lower outlet was really quite easy.

A future project is to change the vanity power wiring, so that the computer power receptacle is fed from the 600-watt inverter which powers the front and rear TVs, the DVD unit, and the satellite TV receiver. (There is already one receptacle above the passenger-side windshield that is fed from the inverter, but it is not very convenient for computer use while we are boondocking.)
The bedroom TV mounted over the vanity area is fed from the inverter, so tapping into this circuit is the logical choice and shouldn't be too difficult—but that project will wait for another time.
Dinette Light Dimmer.
Originally, the double light fixture over our dinette area had two very bright lights in it—much too bright for our tastes. Changing out the bulbs to ones about half as brighnt still didn't meet our requirements. We like subdued light for dinner (more romantic that way), but we like brighter light for playing card games and dominoe games.
We decided to replace the On/Off switch for the light with a dimmer module—but sometimes finding a 12-volt dimmer is not easy nor inexpensive. The easy solution was to buy another 12-volt light dimmer—identical to the one that came as original equipment for our overhead bedroom light fixture. (We were fortunate to find the dimmer at our RV dealer, so we didn't have to special order one from WInnebago.)
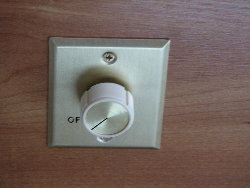
We simply removed the dinette light switch and replaced it with the new dimmer. Now, we have soft light for dining and bright light for games.
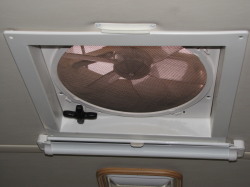
Vent Fans.
SHURflo Comfort Air Fans—we love 'em—they were the answer to our problems.
Our Former Motorhomes. In our former motorhomes, we both had Fantastic Fans in the galley (kitchen) area. We particularly used them, on the slow speed, to provide some air flow through the coach when we left our dogs while we went exploring, shopping, or the occassional change-of-pace to a restaurant for dinner.
The Fantastic Fans moved a good volume of air, but were also audibly quiet (at least on the slow speed setting).
Our Current Motorhome. We were, at first, delighted to have the newer model Fantastic Fans in both the kitchen and the "thunder closet" (bathroom) of our new motorhome. Since our new coach had much taller ceilings, there was a wall switch to turn on the fan and raise the vent cover.
However, we were less-than-happy with the vent covers habitually sticking to the rubber gasket— and the lift motor was not strong enough to overcome the tension. We were constantly having to stand on tip-toes (Mike) or on a small stool (Linda) to manually turn the crank to get the vent lids open. Neither we nor our dealer were ever able to solve this problem.
Additionally, apparently the Fantastic Fan engineers decided to "crank up the RPMs" of the new fans to move more air. Unfortunately for us, the higher speed (even on the Low speed setting) caused a substantially higher noise level which we found to be very annoying.
Comfort Air to the Rescue. One day, we just happened to see an ad in the FMCA magazine for Comfort Air fans (made by SHURFlo, the folks who make most of the RV water pumps). The ad caught our attention for several reasons:
- Variable Speed
- Reversible Fan Direction
- Use as a Ceiling Fan
- Remote Control
At first, we were a bit taken aback by the rather hefty price tag of the units, but we were drawn by the variable speed and the remote control features.
We bought two of the units at our favorite camping supply store and also arranged for their technicians to replace our almost-new Fantastic Fans with the new Comfort Air fans—for a price much less expensive than our local RV dealer.
If the coach is hot, we can exhaust the hot air. If the evening air is cool, we can reverse the fan direction and draw in the cool air.
One of the nice features (but one that we seldom use) is the built-in "cover" that can be pulled across the bottom of the fan opening to close off the light coming through the vent lid. On older fan units, we had to mess around with velcro and separate cover pieces—always a hassle to install, and a bigger hassle to find when we needed them.
At first, we thought that the remote control wold be good only for starting and stopping the fan, but now that we have had the new fans installed for awhile, we are quite surprised at how often we use just the ceiling fan option (with the vent lid closed) or, more often, the ability to reverse the air flow and suck in cool evening air to a hot and stuffy coach.
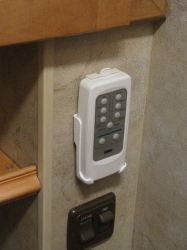
For us, the bottom line is we love our new Comfort Air fans. The remote controls are a joy to use, the vent covers don't stick, and the fans are almost whisper quiet.
Yes, the new fans may have been pricey, but we now use them all the time, in many different situations, and we think of them as one of our better RV improvements.
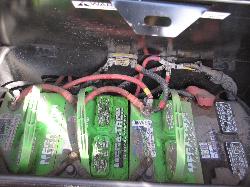
Additional House Battery.
Even though we don't make a habit of boondocking, Mike decided that it would be a benefit to have an additional house battery in our motorhome, giving us 300 Amps of battery power rather than only 200 Amps of battery power. Our "gasser" motorhome has three batteries tucked under the entrance steps—two for the house and one for the engine. Taking a cue from a resourceful Canadian friend, Mike knew that he could fit another battery in the step compartment if he removed the battery hold-down clamps from the three existing batteries.
At the same time, Mike knew that he could eventually replace our Type 24 house batteries (about 100 Amps capacity each) with Type 27 house batteries (about 110 Amps capacity each). Our existing battery compartment had enough depth for the larger 12-volt deep cycle batteries, but, unfortunately, not enough height to switch to the more hefty 6-volt golf cart style batteries (like the Trojan T-105s).
Adding the extra house battery only required purchasing the required heavy duty battery cables from one of the vendors in Quartzsite who specializes in solar installations.
Electronic Modifications
Yes, we enjoy a little bit of TV, but we are not fanatics about it. However, since we enjoy camping in forested areas, we often have to connect our portable satellite dish to get reception. We have also become addicted to having a TIVO box, so that we can record desired shows—and skip through the many commercials. We have become spoiled in expecting an hour-long show to take only 45 minutes!
Since we always bring our original TIVO box with us, it is a pain to have to take it out of its storage space to connect the portable satellite connection or to reconnect the roof-top satellite dish to the TIVO box.
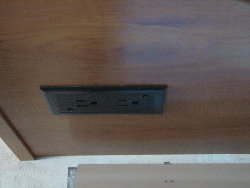
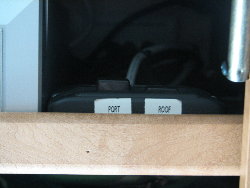
Coax Switch to Select Roof Dish or Portable Dish.
One of the first modifications we made to our new motorhome was to add a coaxial switch (and the necessary cables to hook it up), so that we can quickly and easily switch the input to our TIVO box from the roof-mounted satellite dish to the portable satellite dish that we carry with us (when the trees are too dense to receive satellite TV).
We mounted the switch at the front of the shelf where the TIVO box resides in the motorhome. Pushing the ROOF switch connects the roof-mounted satellite dish to the TIVO box, and pushing the PORT switch connects the portable satellite dish to the TIVO box. (The switch box is set up so that only one of the switches can be depressed at one time.)
Our new motorhome came equipped with a dual coax outlet in the driver's overhead compartment that had connections for both the roof-mounted dish, as well as a connection from the electrical bay where there is a coax jack for connecting a portable dish (without dragging an ugly cable through a window)— nice job Winnebago!
Two short lengths of RG-6 coax run from the dual coax outlet in the driver's overhead compartment to each side of the coax switch. Another short length of RG-6 coax runs from the common port on the switch to the SAT IN connection on the back of the TIVO box.
Switching back and forth between the roof-mounted satellite dish and our portable satellite dish is now a no-brainer. We always seem to forget, however, that the portable dish only has one feed from the LNB, and we are always forgetting to re-run the TIVO setup (one feed vs. two feeds) when we switch between the roof dish and the portable dish.
The only problem we have had with this switchable dish setup is wondering why we have no TV reception from the roof-top dish (when we have forgotten to reset the switch to its usual ROOF position)!
Adding Dual Feed from Roof-Top Satellite Dish.
Linda truly enjoys her TIVO, but she soon became frustrated when we were on the road, since our roof-top satellite dish only had one feed from the antenna down into the motorhome.
To get full utilization out of the TIVO box—being able to record two TV shows at the same time, or to listen to music on one channel and record a TV show on a different channel, requires two independent feeds from the satellite dish. Our roof-top dish only had a single coax feed down into the motorhome, and we suspected, incorrectly, that our Winegard dish only had a single feed LNB, so we hesitated in "tearing things apart."
When Linda was just about totally frustrated, we endeavored to add a dual-feed LNB to our roof-top dish and to run a second coax cable down inside the motorhome. However, we quickly discovered that our roof-top dish already was configured with a dual-feed LNB, but that only one downlead was being used. The difficult part was opening up the cover plate on our roof and feeding a second coax cable through it and down into the motorhome. Snaking the cable from the roof-top opening over to the TIVO compartment was a real exercise in frustration—but we (one of our sons, actually) succeeded, after using his head to remove one of the overhead surround sound speakers that gave him direct access to the overhead hole as well as into the TV compartment.
You can read more details about this endeavor in the Satellite TV section of our web site. Needless to say, Linda was estatic in finally being able to get the most out of the TIVO box.
Space Modifications
As most experienced RVers know, RV manufacturers often waste valuable space in an RV. Our 2006 Itasca Suncruiser 33V was no exception.
Experienced RVers are always looking for more space in their RVs. Sometimes fancy cabinets with small doors intrude on the available space, but there is little you can do to easily change them. However, there are many instances when a little snooping around will find sometimes rather larger places that can be considered "wasted space."
While we were still in the looky-loo mode, wondering if we could find a motorhome better suited to our tastes than a Winnebgo or Itasca 33V (we never found one), We had the good fortune to run across a very resourceful Canadian, Arnold Grove, who had a 2002 Winnebago Adventurer 33V and who had made several improvements on the space management inside his RV.
He graciously allowed us to take pictures, both inside and outside of his RV of the many improvements that he had made. Our own prowling through 33Vs from 2002 through 2005 had suggested additional changes that we thought we would eventually make—when we finally got a 33V of our own.
When we finally "bit the bullet" and ordered our new 2006 Itasca Suncruiser 33V, we were surprised when we picked it up that some subtle, and not so subtle, changes had been made to the interior floor plan. We had carefully designed a nice floor-to-ceiling cabinet for the bathroom, but we discovered that our new motorhome no longer had 8 inches of wasted floor space in the bathroom—so much for that design.
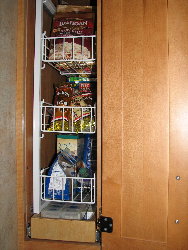
Enhanced Pantry Storage.
When we were looking at Suncruiser 33Vs (for several years), we discovered that they came from the factory with wooden pantry shelves—nice to look at, but limiting the storage space on each shelf. Linda quickly determined that the wooden shelves were too thick to allow two 303 cans (regular sized tin cans) to be stored, one behind the other, in the same shelf space.
In our explorations of Suncruisers and Sunrise (the next level down in the Itasca line), Linda discovered that wire-frame pantry shelves, instead of wood, were used in the lower-level coach—and were thinner, thus allowing two cans to be placed front-to-back in each storage shelf. Since RVers everywhere are almost always looking to maximize the storage space in their RVs, we opted to order our new Suncruiser with the wire-frame pantry shelves.

Even though this "option" cost us some extra money, Linda is quite happy with the extra storage space available in each of the pantry shelves.
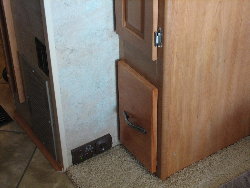
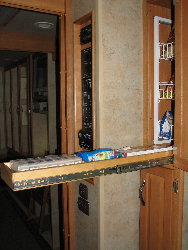
Soda Pop and Wine Drawer.
Behind the rear dinette seat under the driver-side pantry was a space that contained only a 110-volt duplex electrical receptacle.
Our first modification, thanks to Arnold's example, was to move the electrical receptacle from behind the rear dinette seat (moving it to the side about 12 inches). Moving the electrical outlet opened up a huge amount of wasted space behind it. With the outlet removed, there was a space 7 inches wide, by 13 inches high and a whopping 28 inches deep!
We copied the general idea of Arnold, and put in a large, tall, and very deep drawer in the wasted space. Using 28"-long full-extension drawer slides allows us to pull the drawer all the way out of the wall.
 |
|
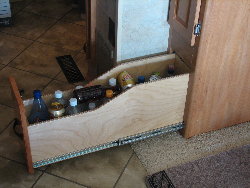 |
This drawer is perfect for storing soda pop cans, tall 2-liter bottles of whatever, and even the 5-liter boxes of box wine that we enjoy.
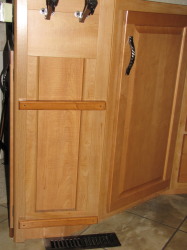
Knick-Knack Drawer.
Our motorhome originally came with a small pull-out bread board mounted behind a hinged false-front drawer —poorly designed and installed, and it was almost functionally useless. (The drawer front wasn't even set at the same spacing as the drawers below it.)
Removing the bread board and its wooden slide rails gave us the space to make and install a shallow, but fairly deep, drawer that is the perfect catch-all for all sorts of little "stuff."
The drawer is only 1 3/4 inches tall, but it is about 10 inches wide and 22 inches deep. Mounting the drawer on full-extension drawer slides allows easy access to "stuff" crammed in the back of the drawer.
We used the original drop-down drawer front, but removed the hinges, and set the drawer front so that it was aligned with the drawers below it—making a much more esthetic looking installation.
 |
|
 |
Linda thoroughly enjoys having this small drawer right in the kitchen, where it is easily accessed for many different items.
Pill and "More Stuff" Pull-Out Drawer.
Our wire rack pantry shelves are mounted in such a way that almost 3 inches of wasted space is below the bottom shelf.
Another trip to the wood shop resulted in a shallow pull-out drawer about 2 inches high, 7 inches wide, and 28 inches deep.
 |
|
 |
This drawer has a couple of internal cross-wise partitions in it that help to keep the contents separated. We use the front compartment for our gaggle of daily pills. The rest of the drawer contains smaller "stuff" that would otherwise get lost in a larger drawer.
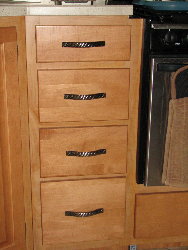
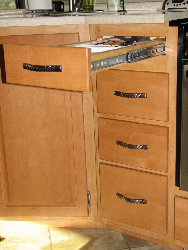
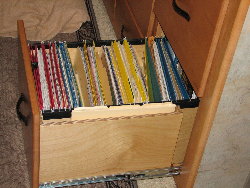
Dual File Drawers.
The bedroom area of our motorhome is nicely equipped with a three-door wardrobe, with a very useful bank of eight drawers underneath. The two large drawers closest to the vanity are 14 inches wide and 11 inches tall, but were only 12 inches deep—a seeming waste when the depth of the wardrobe was 20 inches.
Removing the drawers revealed a lot of "unused" space, only some of which was apparently meant to be used as a return air plenum for the LP furnace.
We decided that what we really needed was two "File" drawers that could accommodate hanging file folders to help organize and store our many maps, travel books, and even some computer books and "stuff."
So, back to the shop we went to design two drawers to fit the existing face frame openings, have an inner separator for hanging file folders, and to use as much depth as possible. The top edges of both drawers are fitted with plastic file folder rails to allow the hanging file folders to be easily moved forward or backward.
The bottom file drawer had to be designed with a notch in the back to clear a bundle of electrical cables that could not be moved. The top file drawer did not need the funny notch in it.
Putting full-extension drawer slides on both file drawers allows us to easily fish out the files at the rear of the drawers. The added storage of these drawers, and the convenience of them now being true file drawers, has been a wonderful boon to keeping all of our "stuff" neat and easily accessible.
During the few times when we have been boondocking and need to use the LP furnace, we try to remember to pull open the bottom file drawer to help the furnace circulate nice warm air.
The left picture shows the new bottom file drawer, and the right picture shows the difference between the original puny-sized top drawer and the more useful new bottom drawer.
 |
|
 |
Now that both drawers have been changed to the more spacious size, we have better organization and more useful storage.
Key and What-Not Hook Rack.
One of the first "mods" that we made to our new motorhome, because it was so easy, was to add a row of small cup hooks in the stairwell cupboard that provided access to the 120-volt electrical circuit breaker panel, as well as a bunch of 12-volt circuit breakers for various coach circuits.
Simply adding a row of small cup hooks gave us a handy place to store our various rings of keys, our electronic bug-zapper (shaped like a tennis racket), a small flashlight for late evening dog walks, a dog leash, etc.
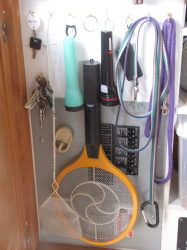
Having all these diverse items in one place, right next to the entry door, makes things so much more organized and convenient.
Shelf Above Entry Door.
Like most RVers, Linda is always trying to find ways to make our home on wheels seem more personalized and having a character that suits the two of us.
She added some small battery operated votive candles to the very small ledge space above the entry door, and she really liked the looks—especially since the "candles" would automatically turn on at 6PM (when Linda had first set them up) and then turn off after five hours (repeating this timing every night until the batteries ran down).
Quite surprisingly, these small candles actually stayed in place on the narrow ledge above the entry door even as we traveled down the road.
However, once Linda started looking at the narrow space above the entry door, she decided that what was needed was a wider shelf over the door, so that more small decorations could be added above the door.
So, of course, out came the tape measure to see what width was involved, and then it was out to the woodshop to find a piece of wood that would suffice for the bottom of the new shelf (about 4 inches) in this case. A trip to Home Depot unexpectedly found the perfect piece of molding—with an ivy motif carved/stamped into the face—to act as the front lip of the shelf.
After making yet again some more sawdust, gluing up the pieces, applying three coats of stain (trying to match the existing interior color), and adding a coat of polyurethane—the new entry door shelf was finally finished.
Since the side medallions and the wide trim above the door were already in place, it was a simple matter of three screws to attach the new, wide shelf to the existing trim.
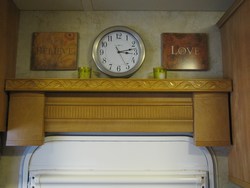
Linda thoroughly enjoys have the little shelf above the entry door to store small knick-knacks. We even travel down the road with two small candles on the shelf, and they stay in place quite nicely.
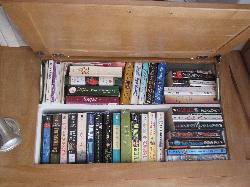
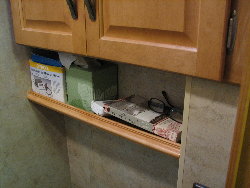
Shelves in Driver/Passenger Overhead Side Cupboards.
We quickly discovered that the overhead compartments above the driver and passenger windows needed an interior shelf to get any amount of usable storage space.
Wanting to "keep it simple," we made two shelves with "legs" on each end (like an upside-down "U"). We added an edge band to the Melamine parts to finish off the looks of the shelves.
Much to our surprise, the two overhead compartments were not the same (in either size or depth), so we had to tweak the shelf dimensions to fit each compartment.
 |
|
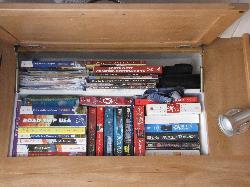 |
We have been quite amazed at just how many books and "little stuff" that we can put in these rather tight spaces.
Extra Shelf in Stairwell Cupboard.
Linda decided that the most convenient spot to store our little poodle's dog food was right next to the key hook rack in the compartment by the entry stairwell.
Our motorhome only had one small shelf, so we immediately decided to add a second shelf in the compartment. However, the original shelf brackets were too short, so we had to cut and install longer shelf brackets to accommodate both the old and new shelves.
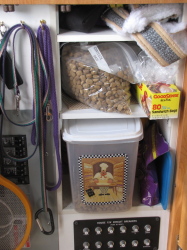
Adding a second Melamine shelf has worked out very well—keeping most of our dog-related items in one general area.
Clothes Hooks on Wardrobe Doors.
Even though we have plenty of space for clothes in the triple wardrobe, trying to dig out a jacket or sweater often seems to be a pain in the rear (because we always seem to have too many clothes crammed into the hanger space).
One day Linda commented that she wished that there were some clothes hooks on the backs of the wardrobe doors, so that she could easily grab a light jacket or a sweater for walking the dog.
At almost every swap meet, we noticed some cheap 3-hook clothes hangers on crappy looking wood boards. After some thorough (read nit-picky) inspection, we purchased three of these boards—but only to get 9 good-looking brass clothes hooks. (The poorly fabricated wood boards ended up in our donation of Quartzsite fire wood.)
After a little bit of puttering in the wood shop, the "new" wood backer boards were fabricated, stained (as close as we could manage) to match the Sierra Maple stain in our motorhome, and then finished off with a coat of Polyurethane.
We attached the new clothes hook boards to the inside of all three wardrobe doors with construction adhesive (plain old Liquid Nails).
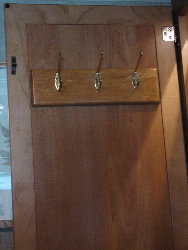
Linda now enjoys the convenience of having nine clothes hooks within easy reach.
Bathroom Shelf.
RVers are always looking for ways to make space to store more "stuff," or at least to store items in convenient places—and we are certanly no exception.
We decided to make use of some "wasted space" above the toilet and below the small cabinet in our "thunder closet."
We agreed that a small shelf with a raised lip across the front would work well for storing smaller bathroom items.
After making some more sawdust, and doing a bit of staining, we had a very usable storage shelf addition in our bathroom area.
While we were at it, we also added an additional shelf inside the cabinet. All it took was four additional shelf clips and a shelf (with a small front lip) cut to the proper dimensions.
Mop and Broom Hanger.
Finding enough space in an RV to store all the stuff that seems to accumulate can sometimes be a challenge—and the small and sometimes narrow spaces in an RV called a bathroom (thunder closet, throne room, or whatever term you prefer) can be especially challenging.
In our motorhome, the commode is separated in its own compartment, leaving both floor and wall space at a minimum. Our usual method was to prop the broom and mop in one corner behind the commode. Of course, the broom and mop would slide around while we traveled. Whenever we wanted to get the broom, sometimes it was almost a puzzle to figure out how to get it extricated from behind the toilet.
As sometimes happens, one day a thought occurred (bless me, for it is in a strange place), and a quick and easy hanger bracket was envisioned to hold both the broom and the mop in an upright and easily reachable spot—yet out of the way.
Making the hanger was a quick and easy job. I found the perfect piece of wood in the scrap pile, did a little cutting, routing, drilling, and sanding on it. Then did a quick stain job and added a coat of polyurethane over the top— and the hanger was almost complete. Adding two broom clips finished off the hanger, and it was attached to the side wall of the thunder closet.
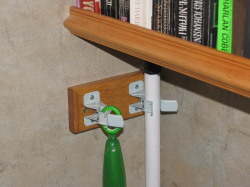
With the mop and broom now hanging on the wall (even after a rough trip down the road), the bathroom area seems much less cluttered, and the broom and mop are always in the same place—if we remember to put them back where they now belong.
Scale Storage and Magazine Rack.
We carry a small scale with us to keep tabs on our weight as we travel around (weve got to keep watch on our slim and trim figures—yeah, right).
The scale was always an awkward item to try and stow in the bathroom—not enough floor space to lay it down and no way to stand it against the wall and expect it to stay there.
Many times while I was sitting on the throne, I found myself staring at the empty wall space in front of my knees. Suffice it to say that, after several sessions, an idea slowly took shape in my clouded mind on how to make a storage rack for the wall that would hold the scale and also provide a place to store magazines and other flotsam.
Being of a pecunious bent (aka tight), I scrounged around the shop to find some scraps that could be assembled into what I had envisioned.
Admittedly, I am a nit-picker when it comes to building things, so this project took a bit of time to fabricate. Since I enjoy woodworking, it was fun to do a lot of tweaking and shaping on several pieces of wood, and to then assemble the pieces into a decent looking storage space.
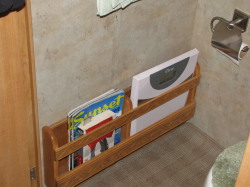
Mounting the storage rack to the front wall of the thunder closet provided a very usable space, up and off the floor, to store the scale as well as some magazines. Now the scale does not slide all over the compartment when we travel down the road, and the area certainly looks neater without a bunch of items sitting around on the floor.
Sink Cover Storage.
Our motorhome came with a nice Corian cover that fits over the top of the sink (giving us extra counter space when we need it). However, the cover is rather thin, and its rounded edges make it difficult to stand up against a wall surface without the cover wanting to slide down. With the replacement cost of that cover being totally outrageous, we neeeded a better way to store the sink cover when we were using the sink.
Unexpectedly, a flash of inspiration suddenly came (after we had used our motorhome for almost four years). Mike made some scribbles in his "design book," and then headed out to the woodshop. What emerged was a simple storage rack, using two thin strips of Maple—machined and stained to match the style of the cabinets in our motorhome.The sink cover rack is mounted just to the left of the sink, and is easily reached while standing at the sink. The thin Corian sink cover is simply slid between the top and bottom "rails" of the rack.
The left photo shows how the empty sink cover rack looks when there is no sink cover being stored (which is most of the time), and especially when we are rolling down the road toward our next destination. The right photo shows how the sink cover sits in the rack when we are using the sink.
 |
|
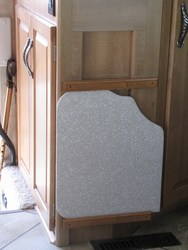 |
Linda is extremely happy that there is now a safe place to store the sink cover without fear that it will fall and break.
Power Brick Shelf.
At the same time that we added the extra electrical outlet under the vanity top, we also made a small shelf, with a raised lip on the front and sides, to hold all the power bricks for our computer stuff. We added a surge-protector power strip under the table top and near the lower shelf. This way, all the bulky and unsightly power bricks and power cords are out of sight. We drilled one hole in the left rear corner of the vanity top, and installed a plastic grommet. All the small power cords come up through the grommet and are neatly routed to the various pieces of equipment.
The shelf lip holds the power bricks in place, and we don't have any problem with them falling off the shelf when we drive down even the most bumpy roads.
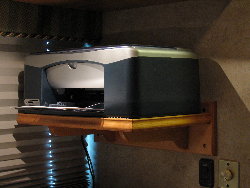
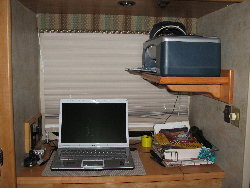
Printer Shelf.
While we were making the vanity area into a dedicated computer work area, we also made a shelf for our all-in-one printer so that it sits on a side-wall shelf on the side of the vanity area—leaving the desk space free for our laptop computer and other "stuff." The printer gets a surprising amount of use, but mostly as a copy machine—especially for Quartzsite and Yuma maps for newbies.
The lip around the edges of the shelf, along with a piece of anti-slip mat under the printer, keeps the printer in its place, even on bumpy roads.
 |
|
 |
Router/Server Shelf.
A year or so ago, Linda got tired of hearing Mike grouse and gripe whenever he had poor, little, or no Internet connectivity wherever we happened to be stopped (either for only a day or for an entire week). Linda solved the problem by buying Mike a Verizon Air Card as a Father's Day gift—but left it up to him to pay the monthly access charges! (Smart lady.)
However, that little bit of fortune for Mike soon snowballed. Rather quickly, both Linda and Mike each ended up with laptop computers. However, only one computer at a time could be on the Internet with the Air Card—not a conducive situation for continued friendship among two close individuals.
The next acquisition was a wireless router (a Cradlepoint CTR500), purchased from the very knowledgeable and RV friendly 3Gstore, that would accept the Air Card—thus enabling both laptop computers to be on the Internet at the same time. So, for awhile, both Linda and Mike seemed content.
That arrangement was fine for awhile, but then they both got lazy—and tired of walking into the bedroom to hook up their laptop to the printer when they needed to print out anything.
Soon, a Hewlett-Packard wireless print server was added to the ever-growing pile of electronic equipment cluttering up the vanity area of our motorhome which serves as our computer center. All of a sudden, there were electronic gadgets, USB cables, and power cables seemingly all over the place.
Since Linda is the neat-nick in our motorhome, while Mike is the typical slob (typical boy, ya know), it was soon time to tame the mess. Mike happened to be aware of the unused wall space on the left side of the vanity area— with the printer already occupying the right-side wall space on its own shelf.
After some time in the wood shop, and the making of more sawdust, along with a wee bit of staining, a small shelf appeared—that neatly provided a place for both the router and the wireless print server to be stored up and off of the badly needed counter space of the vanity area.
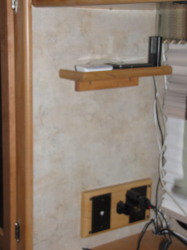
After the power cords and USB cable to the printer were dressed and tied back, the installation of the new router/server shelf really improves both the functionality and appearance of the computer work area in the vanity area of our motorhome. Yes, Linda is pleased—which makes Mike smile with relief.
Storage Drawers Below Vanity.
Although not strictly a space modification, the addition of a plastic six-drawer unit under the right side of the vanity greatly simplified our storage needs near our desk/computer work area.
Linda was able to find a six-drawer unit that "just fit" under the vanity, was the full depth of the vanity, and yet left both of us plenty of leg room while sitting at the computer work area.
This handy unit holds the usual bits and pieces that are needed at a desk, such as pens and pencils, sticky note, scotch tape, a stapler, etc. Another drawer holds many of our printer supplies such as extra ink cartridges. Yet another drawer holds a ream of extra printer paper. Another drawer holds some of our needed computer supplies such as "sometimes needed" software CDs, and as well as computer cables. A couple of the drawers are crammed with some of the scrapbooking supplies that Linda uses when she decided to get creative.

Probably more than almost any other addition, this set of drawers has made our desk/computer work area much more organized and useful. We can't imagine being without it.
Additional Storage Behind New Bedroom TV.
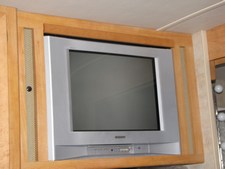
This modification was, by far, the most labor intensive and complex of all the mods that we have made—but has resulted in being the most useful and beneficial of all!
Since our Suncruiser motorhome is a 2006 model, the TVs in the coach are the old analog style with the large CRT picture tubes. We seldom use the rear TV, except when the grand kids are present and want to watch a DVD.
For years and years, now, Linda has been politely grousing about all of the "lost" storage space that could be gained if we removed the old-style CRT TV and replaced it with a new HD flat screen TV. Although Mike loves to work with wood, he is also more than a wee bit of a procrastinator. After listening to Linda urge for the bedroom TV replacement to gain storage, Mike finally broke down and bought a nice 22" HD flat screen TV that would fit in the available space. (A 26" HD flat screen TV was too large to fit in the available space without doing some major rework to the cabinetry.)
Of course, buying the new TV and making the necessary mods to the motohome are two different stories. After two years of using the new TV in the shop as a music source, Mike finally decided it was time to get busy in the shop and start making a workable mounting for the new flat screen TV. The job turned out to be a lot more labor intensive than first imagined.
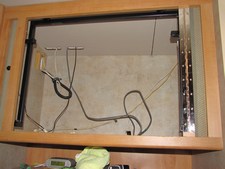
The first obstacle in removing the old TV was to determine how it was held in place. Winnebago did a very thorough job of making sure that the original and heavy TV was securely held in place! Mike discovered that the bottom of the cabinet that held the TV had a false bottom. Once the false bottom was removed, two large bolts and three different clamps met your gaze. Once the TV was finally loose, it could be removed. Because the TV was so heavy, two strong backs made the job much easier.
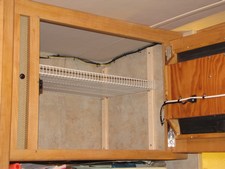
Once the old TV was removed, we were both amazed at the huge storage space now available over the vanity area in the bedroom! Removing the old TV opened up a storage space that was 34" wide, 19 1/2" inches tall, and was 19" deep on the left side and 22" deep on the right side. Wow, the space seemed visually huge.
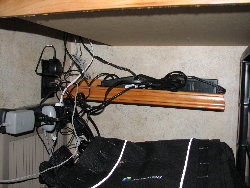
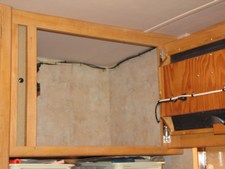
Of course, the first problem to greet the eye in the newly vacated compartment was the messy array of cables criss-crossing all over the space. There were 120 volt cables, the TV coax cable, and the remote control cable that re-transmitted "clicker" signals from the rear bedroom to the front of the coach where the satellite receiver and the DVD player are located, as well as a pair of 12 volt wires that powered the bathroom lights. Initially, it was a visual mess, but it was rather easy to dress the cables along the top and sides of the old TV compartment using small cable clamps. (The only stinker was the 12 volt wires that had to be cut and lengthed in order for them to be routed around the edge of the compartment.)
Empty compartment when TV first removed. |
Empty compartment after cables dressed |
|
|
|
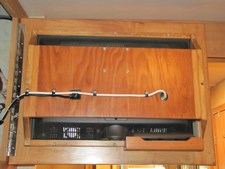
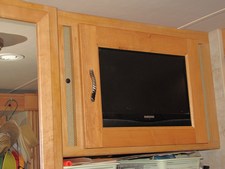
Mike's idea was to make a frame (like a cabinet door), with the new TV in the middle—so that the new TV looked like a picture, but opened outward like a door to reveal the added storage space behind it.
Linda always accuses Mike of "analysis paralysis," and she is usually correct. Mike likes to thoroughly design a project before he ever cuts any wood (but he always manages to screw up at least once on every project). After more than a year of "designing" and tweaking, Mike finally felt that he had developed a workable solution for making a frame for the new TV that would blend into the existing woodwork, and still provide for loads of additional storage space (where the old TV used to reside).
Since Mike is also known as a nit-picker, he wanted to new TV door to look like it had always been there (and not a crude add-on). Raiding his dwindling supply of good Maple wood, Mike built a door, with the same edge treatment as all the other cabinetry in the coach, and also with the same handle hardware as used throughout the coach. Mike used the same stain as he had used on other additions to the coach. (The original stain is not available from Winnebago, but Mike found a substitute that comes very close to matching the original wood finish used on all the coach wood work.)
With the old TV in the bedroom, finding a good location for the remote was always a problem, so Mike decided to build in a holder for the new TV remote that was accessible when the new "TV door" was opened.
Developing a method of holding the new TV to the new "TV door" was a bit of a challenge, but a workable solution finally emerged—securely holding the TV to the door while still allowing for adequate ventilation of the electronics in the TV.
Because the weight of the door and the TV seemed rather heavy, Mike decided to use a piano hinge along the entire right side of the door (instead of two small hinges) and to keep the door closed by using rare earth magnets embedded in the door and in the cabinet frame. However, on our first trip out, we discovered that the magnets were not strong enough to hold the TV door closed. Adding a door/drawer latch (like all the others in the coach) readily solved the problem, and the door now stays closed unless opened by one of us.
Mike always likes to surprise Linda, so he had not told her of the new TV door. Imagine her surprise when we were driving down the road and the door came open and started swinging back and forth. Linda's keen hearing detected the problem, but she was at first baffled at the sight (since there was supposedly no door above the vanity). When she finally discovered the problem, she was very happy with the change, but immediately wanted a more secure latch than the rare earth magnets.
Back of new TV door |
New Flat Screen TV door |
|
|
|
Now that the new TV door has been installed, Mike is very relieved to have finished a rather taxing project, and Linda is very happy to have all the extra storage space (34" W x 19 1/2" H x 20 1/2" avg. D) in the bedroom. [For the purists out there, the left-side depth is 19" and the right-side depth is 22".] Both of us are happy with the end result. Linda is still trying to decide what she wants to store and how she wants to store them in the new space. Decisions, decisions. Whew!
But peace and tranquility quickly vanished—when Linda decided that her vast new storage space in the bedroom needed a shelf to help organize and store more "stuff" without it being crammed into the new space.
Fortunately, adding a shelf was rather easy, since Mike already had some unused wire shelving (that had not already made its way into the various exterior RV compartments). Some 1x2 vertical uprights with shelf holes spaced in them were easily made; the hard part was getting them installed. The various bundles of wires always seemed to be in the wrong place, and some of the shelf support boards had to be trimmed to fit.
Linda was happy with the end result, and Mike could once again breath a little easier—at least for a little while.
Drawers in Bottom of Wardrobe Closets.
Linda is always looking for better ways to organize all the "stuff" in our motorhome, and she is always looking for a better way to make the content of our wardrobe closets more accessible and less cluttered.
It seems that we always have too many clothes—and there is always too much "stuff" littering the floor of the wardrobes. Our pile of shoes always seems to get moved around and mixed with items that just happen to be on the floor of the wardrobes.
A few months back, Linda found the perfect solution (at least to her) to "our" problem while she was wandering the aisles of a WalMart store.
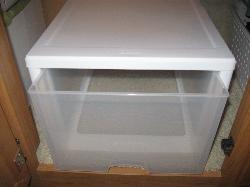
She found some fairly large plastic drawers that also had a nice, flat, broad surface over the top of them. These drawers fit neatly into the bottom of each of our three wardrobe closets, and they are a perfect place to put shoes, sweathers, and other items that are not needed on a daily basis.
Now, Linda is a much happier camper, and she is pleased with the "extra" storage space that now occupies the bottom of each wardrobe compartment. For once, adding the plastic drawers was a simple task, and one easily implemented "right now"—which makes Linda a happy camper indeed.
Convenience/Esthetics "Modifications"
Replaced Several Original Day/Night Shades with New MCD American Duo Shades.
Up until the past few years (prior to 2010), almost all of the RVs came equipped with the old style pleated day/night shades, with the bottom (lighter colored) part being the day shade and the upper (darker colored) part being the night shade.
These day/night shades served their purpose, but could be a royal pain the the butt in getting them to stay in the "up" position, and not having their internal strings fray and break with much too frequent regularity.
We had three of the older day/night shades that had seen better days (pleats that wouldn't bend, stained fabric, broken strings, and recalcitrant shades that refused to go all the way up and stay there).
We had noticed that several of our RV friends who had newer coaches had a much nicer shade setup. The MCD Innovations American Duo shades resemble the old roller shades of yester year, but have two shades mounted one above the other—with the bottom shade being the day shade (resembling a tight weave mosquito netting in dark black), and the top shade being the night shade (available in many different fabric styles and colors).
The MCD shades are simply pulled down to use whichever shade (day or night) is desired. A gentle/short pull down on the bottom of the shade causes the shade to retract at a preset speed and to a preset height—both easily set at the time of installation. The shades can also be procured as a single shade—American Solo (either a day shade or a night shade).
For those on an unlimited budget, the shades are available with 12-volt motors and a remote clicker to activate the shades one at a time or all shades at once! MCD Innovations MCD Innovations also makes full-width shades that can span the entire windshield area.
While we were in Yuma, AZ, a couple of years ago, we stopped at one of the local firms that retrofit RVs, and we gathered as much informaton as we could about the MCD shades. Being of the pecunious bent (i.e., having short arms and deep pockets), we were rather surprised at how expensive the shades seemed to be—especially the motorized ones! While we were at the retrofit place we were able to borrow a set of fabric samples of the night shades to see which color and fabric pattern best suited our tastes.
We quickly determined (even without a calculator) that we could not begin to afford the cost of totally replacing all of the old day/night shades in our coach. So, for the time being, we put all of our new information in a folder and set it aside for "sometime in the future."
As time went on, Linda became increasingly irked at the looks of our old day/night shades and how difficult they were to use. On one of our outtings, Linda dragged out the MCD folder and we renewed our interest in replacing at least "some" of our old day/night shades. Linda decided that the two large shades by the dinette and living room couch were the first candidates for replacement, along with the much smaller shade behind the recliner. After stewing a little bit about the cost of the new MCD shades, we decided that the three shades (mentioned above) were within our budgetary constraints—as long as we settled for just the manual pull down shades. The cost of six motors for the three American Duo shades was far beyond our budget and sensibilities.
During the late summer of 2013, we were headed to the far northern reaches of California for a car show and then into Oregon for a short visit, so we decided to order our new MCD shades through one of the MCD dealers in Oregon, Davis Cabinets. Linda also liked the idea of not having to pay sales tax in Oregon.
Ordering the new shades was a simple matter of measuring the width of the space inside the valances around our windows and also measuring the depth of the valances from top to bottom. We knew what color/style of fabric we wanted for the night shades, so it was just an easy (and very friendly) telephone call to Davis Cabinets to get the new shades on order. The shades would take about three weeks to fabricate and get shipped to Oregon. (Of course, Linda timed the delivery of the shades to the time that we would be near Junction City, Oregon. Such a clever lady.)
We pulled into the parking lot of Davis Cabinets in the late afternoon, and we were given 20A power to get us through the night. The shade installers arrived before 0800 in the morning, and our new shades were unpacked, adjustments set, and fully installed in less than two hours. The friendliness of the owners and the worker bees was excellent, and we will be back there again when we feel it is time to replace some more of our old day/night shades.
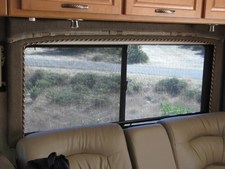
New MCD Day Shade |
New MCD Night Shade |
|
|
|
After having our new MCD shades installed and we were back on the road, we immediately noticed three striking differences with the new shades (as opposed to the old shades).
- The new shades retracted all the way to the top of the windows
(instead of leaving about six inches of the window covered). - The coach interior seemed much brighter at night when the night shades were pulled down
(the light ivory color is much more visually appealing than the dark gray of the old night shades). - When camped, we fully open the shades every day—not just once in awhile
(to let in the vibrant colors of mother nature).
To say that we are very pleased with our new MCD American Duo shades is a mild understatement. We love 'em!
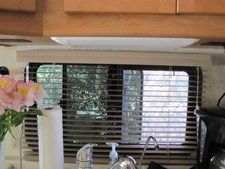
However, as you well might imagine, it didn't take Linda very long to begin talking about getting rid of the ugly, noisy, and dust magnet of the mini-blinds behind the kitchen sink. She had mentioned that we should consider swapping out out on our next trip to Oregon.
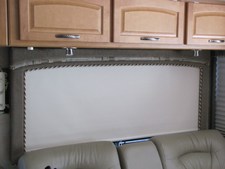
Of course, devious old Mike immediately had another idea. When Linda was not present, he measured the entire window area, determined what size night-only shade would fit in the space, and then set about to design a wooden valence for the "yet-to-be-ordered" shade that would match other add-on wood work in the coach.
Mike called MCD directly and placed the order for the Amwerican Solo (single night shade only) while we were still on the road. The shade was waiting on MIke's door step when we finally returned from our trip. Already having the carved molding stock on hand, it didn't take Mike too long to have the new wooden valence built, stained to match the coach interior woodwork, and to put a coat of sealer on it.
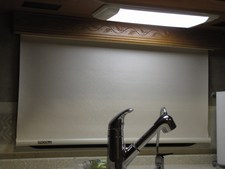
Again, Mike didn't mention the new addition, and let Linda discover it on her own. It was interesting to see her look at the window, make a strange face, and then look back at the window to be sure that she really saw what she first thought! Yes, folks, she was very pleased.
Old Kitchen Mini-Blind |
New MCD Solo Night Shade |
|
|
|
Now, opening the kitchen shade in the morning had been added to our routine of opening all the MCD shades to let in the light of the morning. And, yes, Linda is already talking about trying to budget to the future replacement of the old day/night shades on the front and back of our dinette/living room slideout with two American Solo night shades.
Utility "Modifications"
Perhaps the least favorite task of RVers is hooking up and disconnecting their utilities—electric, water, and sewer.
The most annoying aspect is connecting and disconnecting the water hose. For most folks, connecting the water hose puts air into the water lines of the RV, causing lots of spitting and sputtering until the air is purged from the water lines. Disconnecting the hose from the RV usually results in getting an unwelcome spray of cold water as the pressure is discharged from the hose.
Some newer RVs have a built-in flush system that helps rinse out the Black tank—hopefully only when the tank is being drained. However, to use this handy feature usually requires hooking up a separate hose to a separate tank flush fitting in the Utility compartment of the RV.
Most RVers are usually quite self-sufficient, and are also always on the lookout to find easier or better ways of doing something in or around their RV—and we tend to always be looking for useful ideas.
Unorthodox Water Connections.
We didn't really "change" any of the utility connections, we just connected them in a somewhat unorthodox way.
Being somewhat on the lazy side, it seemed like many extra steps were required to hook up and disconnect from a city water supply, and also to hookup a second hose for back-flushing our Black tank.
When hooking up to a city water source, it was somewhat of a pain to attach the hose to the city water spigot, turn it on to get all the air out of the line, turn the water off, hook up the water hose to RV water inlet, and then trying to remembering to go turn the water back on. (Lots of times, we forgot to turn the water back on!)
Conversely when it was time to disconnect the water hose, water seemed to spray everywhere (even when you were slow and careful) when the hose was depressurized.
It seemed wasteful to have to hook up a second hose when we wished to flush out our Black tank. Our motorhome came with a built-in back-flush system, but it required hooking up a second hose whenever we needed to back-flush.
After "borrowing" an idea or two from a friend with a diesel pusher, we came up with a water connection hookup that accomplished many different things:
- Only one hose connection to the campsite water spigot
- Filtered water to the RV
- Regulated water pressure to the RV
- Easily remove air from newly connected water hose (no spitting and sputtering when a tap is turned on)
- Easily depressurize water hose when disconecting (not getting a cold morning shower)
- Quick-disconnect fitting on RV end of water hose
- Allows water to flow into RV or Black tank (with only one hose connection)
- No second hose required to back-flush Black tank
- Full line pressure for back-flushing
- Easily add some water to Black tank after dumping

Although this water connection setup may look a bit strange, and may not work for everyone, for us it works like a champ!
Part of the secret is the "Y" fitting that has 1/4-turn ball valves in each leg—allowing water to flow into either the RV or into the Black tank flush system.
The Black tank flush system comes from the factory with an anti-siphon valve already built in, so you don't have to worry about contaminating your RV fresh water supply.
In our water system arrangement, the pressure regulator is in-line, after the Black tank flush valve but before the RV water inlet. With this arrangement, we always have full water pressure for flushing our Black tank, but the RV internal water pressure is limited to 40 psi.
Hooking Up To City Water. We added a quick-disconnct hose fitting on the input to our RV water system. Hooking up to a city water supply is quite easy. We attach the hose to the city water spigot in the usual way, turning the hose end until it is tight. At the RV end, we simply snap the quick-disconnect fittings together.
Bleeding the newly attached water hose is very easy and leaves no mess on the ground. On the "Y" valve, we turn off the valve to the RV and turn on the valve to the Black tank. Then we go back and turn on the city water spigot. The air in the water hose is discharged into the Black tank, where a little extra air won't hurt anything. Once the spitting and hissing has stopped (indicating that the water hose is now filled with water) we turn off the Black tank valve and turn the RV valve back on. Presto, our RV has a supply of fresh water; there is no air in the water lines; and there is no spitting, sputtering and hissing when we turn on a water tap inside our RV.
Disconnecting From City Water. When it is time to disconnect our RV from the city water supply, it is super easy to bleed the pressure from the water hose without getting a sometimes unexpected shower of cold water. We simply turn off the city water spigot and then, just for a moment, turn on the valve to the Black water tank. The water pressure is released into the Black tank—with no mess on the ground or an unexpected shower.
Back-Flushing Black Water Tank. On those occasions when it is necessary to dump our Black tank at our camping spot, back-flushing the tank is easily done by simply turning off the valve to the RV on the "Y" fitting and turning on the Black tank valve on the "Y" fitting, letting the water run until the effluent exiting the tank runs clear. Yes, we have a clear 45-degree sewer hose fitting between the RV and our sewer hose (so we can see when the tank is empty).
When the Black tank has been dumped and the RV Black tank sewer valve closed, we again turn on the Black tank valve on the "Y" fitting to put two or three gallons of water in the now-empty Black tank. (It is never a good idea to "poo" into a totally empty Black tank!)
Sewer Hose Storage.
For some time after we took possession of our new 2006 Itasca Suncruiser 33V, we were always irritated that there was no convenient place to store the bulky sewer hoses. We carry a 20-foot sewer hose that is used for most occasions, but we also carry an extra 10-foot section, with the appropriate fittings to attach it to our regular hose—for those situations where we need more than 20 feet of sewer hose to reach the campsite sewer connection.
Our new motorhome has much less basement storage space than Mike's previous 1998 Itasca Suncruiser 32WQ, and trying to cram our sewer hoses into one or two plastic tubs in one of our basement compartments was always an annoying task that seemed to waste too much badly needed storage space.
In one of those rare moments when the mental light bulb briefly flashes on, we suddenly conjured up a simple solution to our storage problem. We jumped in our jalopy and headed to the nearest Lowes, where we picked up a seven-foot piece of square, white, hollow, plastic fence post, two end caps, some aluminum flat stock, and a few short carriage bolts, lockwashers, and nuts.
The fence post is large enough in cross section to allow our sewer hose, even with the connection fittings, to be shoved inside. The length of the fence post is long enough that both sections of our sewer hoses easily fit inside. We put the short, seldom used, section in the back of the new hose storage area, and put the frequently used longer piece in last—so that it is easily reached and pulled out when needed. (When the short piece of sewer hose is needed, we use our awning hook to fish it out of the sewer hose storage tube.)
 |
|
 |
We glued the "front" end cap to the fence post, but made a removable end-cap connection on the "rear" of the fence post. We bent the aluminum flat stock into U-shaped straps to hold the new sewer hose storage container to the bottom of our long dinette/living room slide compartments. We drilled drainage holes along the entire bottom edge of the fence post and painted the entire assembly a flat black, so that our new sewer hose storage container blended in to the underside of the motorhome and was not too visually noticeable.
We used the short carriage bolts to attach the fence post to the bottom of the three compartments under our slideout, so that the rear of the new storage tube was at the rear end of our slideout and just behind the compartment doors. We used carriage bolts so that the smooth heads did not cause items stored in the compartment to get caught or scratched. By tightening the nuts fairly snugly, we were able to almost recess the rounded bolt heads into the bottom of the compartment—making a very neat installation. With the slide-out either opened or closed, the sewer storage space is hardly noticeable.
When we need to dump our tanks at our campsite, it is a simple matter to unsnap the pin holding on the rear cap of the sewer hose storage tube, pull out the sewer hose, and take care of our dumping tasks. When we are finished, we simply push the sewer hose back into its storage space, replace the rear end cap, and we are finished.
The lady of the coach is very pleased to have some badly needed storage space in one of our basement compartments, and also to have what she considers a "messy" sewer hose to have its own storage space that is not in a compartment.
On those occasions where we are leaving an RV park that only has a communhity dump station, it is not much of an inconvenience to have to open the large slideout about eight inches or so, allowing us to get to the sewer hose storage bin. (When looking out the left driver's side mirror, it is immediately evident when we have failed to retract the slide before we depart!)
Obviously, as we continue to use our motorhome, we are always coming up with ideas to makes things easier for us. Therefore, we continue to make modifications to our motorhome. Hopefully, this section will keep pace with the modifications that we make over time.
We hope that you might find some of these "modifications" to be of interest to you— to tweak, twist, and change to suit your individual needs and your particular RV. We encourage you to exercise your mind and imagination. And we heartily agree that "plagiarism is the sincerest form of flattery."

